
Sunday, March 23, 2008
Center section begun
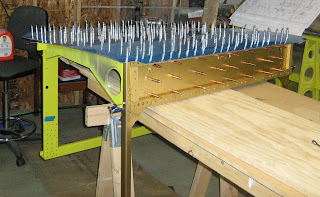
The center section has been clecoed together for the first time. It is upside down in this picture, only one seat rib is visible on the left. The center section bottom skin is on top. The next step is to drill all the holes, and then, once again, disassemble, deburr, dimple, prime, reassemble, and rivet.

Aft fuselage
Aft fuselage
After being disassembled, all the holes were deburred, then dimpled, and then the mating surfaces were primed. All was clecoed back together, and then riveted.
 The upper rivets are left out to make room for the main longerons to be inserted between the skins and the bulkheads. Also the forwardmost bulkhead is not riveted at this time since it will be assembled with the center section.
After being disassembled, all the holes were deburred, then dimpled, and then the mating surfaces were primed. All was clecoed back together, and then riveted.
 The upper rivets are left out to make room for the main longerons to be inserted between the skins and the bulkheads. Also the forwardmost bulkhead is not riveted at this time since it will be assembled with the center section.
Friday, March 7, 2008
The aft bulkheads have been clecoed up with the skins (bottom and both sides) In this picture I have clecoed the aft top skin on but that was just to get everything to stay straight while I put the rear tail piece in. That was the hardest part, the piece is thick, and it wasn't pre-bent very well. So it only went in after a lot of trial and error- a lot of clecoing and unclecoing... 
The aft fuselage shown here starts just aft of the baggage compartment- which is about 2-3 feet aft of the seats. The J-stringers can be seen on the lower sides- 2 on each side- they need to be positioned and drilled.

Once everything has been drilled, all the parts will be disassembled, deburred, dimpled, and primed before being reassembled for riveting.

The aft fuselage shown here starts just aft of the baggage compartment- which is about 2-3 feet aft of the seats. The J-stringers can be seen on the lower sides- 2 on each side- they need to be positioned and drilled.

Once everything has been drilled, all the parts will be disassembled, deburred, dimpled, and primed before being reassembled for riveting.
Sunday, February 24, 2008
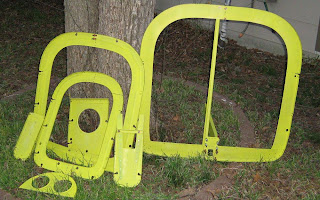
Bulkheads, bulkheads, bulkheads. Here is the completed set of aft bulkheads. These will go inside the aft skins to form the rear part of the fuselage. Notice how they decrease in size. Some of them (esp. the small one in the lower center) have various Al bars and angles attached that will be used to mount the tail pieces later. These bulkheads will be used in the next step- and the parts will start looking more like an actual airplane.
 There is one more bulkhead I haven't shown, the one just aft of the center section that the seat backs mount against- I messed up a part and had to order a replacement- should be here tomorrow. Once that part is fabbed up and primed, that bulkhead (F-706) will be done.
 There is one more bulkhead I haven't shown, the one just aft of the center section that the seat backs mount against- I messed up a part and had to order a replacement- should be here tomorrow. Once that part is fabbed up and primed, that bulkhead (F-706) will be done.
Saturday, February 16, 2008
Fuselage Carry-through
Fuselage bulkhead F-905 is the anodized center section- It was match drilled at the factory to accept the wing spar bolts. It has been completed- the uprights, web stiffeners, and cover plates( on the far side, can't see in this photo) have been primed and riveted. Also, since it is easier to do now, the control column has been bolted up as shown- those are the left and right control sticks. Also the wooden block are placeholder for the wing spars, with a relatively precise thickness.


Monday, February 11, 2008
Firewall
On to the fuselage!
The first thing to be done on the fuselage is to build the bulkheads, from front to back. The forward- most bulkhead is the firewall, on which hopefully an engine will one day mount.
It is stainless steel, with a series of aluminum angles that get riveted to the aft side. The steel weldments in the corners will attach to the longerons. Here it is partially riveted up. The open hole in the upper middle is for a box- makes room for the oil filter and prop governor- its being left out for now as per instructions to make access easier.

Flaps completed
It' s been a while since I updated the blog, but lots of work has been accomplished in the meantime. I finished both flaps: They turned out pretty well, I was a little worried about keeping them straight since they are so long (7 1/2 ft) but using the weights to hold everything against the flat building surface really kept things in alignment. I used a specially modified squeezer set (i.e., ground a bevel into one) to squeeze the trailing edge rivets, rather than the standard backriveting. The trailing edges came out nice and straight.
I'm moving on from the wings for now, and starting work on the fuselage. The wings still have some work remaining- the bottom skins need to be riveted on, and the aileron pushrods fabricated. I want to wait on the bottom skins until I decide what all I want to put in the wings (i.e., autopilot servo). And the I want to wait on the pushrods until the wings are attached to the fuse so that they can be cut to the correct length.
 They turned out pretty well, I was a little worried about keeping them straight since they are so long (7 1/2 ft) but using the weights to hold everything against the flat building surface really kept things in alignment. I used a specially modified squeezer set (i.e., ground a bevel into one) to squeeze the trailing edge rivets, rather than the standard backriveting. The trailing edges came out nice and straight.
I'm moving on from the wings for now, and starting work on the fuselage. The wings still have some work remaining- the bottom skins need to be riveted on, and the aileron pushrods fabricated. I want to wait on the bottom skins until I decide what all I want to put in the wings (i.e., autopilot servo). And the I want to wait on the pushrods until the wings are attached to the fuse so that they can be cut to the correct length.
Subscribe to:
Posts (Atom)
