
Sunday, March 23, 2008
Center section begun
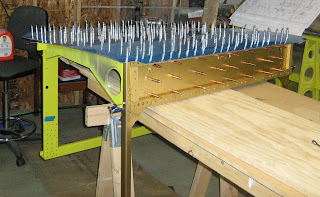
The center section has been clecoed together for the first time. It is upside down in this picture, only one seat rib is visible on the left. The center section bottom skin is on top. The next step is to drill all the holes, and then, once again, disassemble, deburr, dimple, prime, reassemble, and rivet.
Aft fuselage
Aft fuselage
After being disassembled, all the holes were deburred, then dimpled, and then the mating surfaces were primed. All was clecoed back together, and then riveted.
 The upper rivets are left out to make room for the main longerons to be inserted between the skins and the bulkheads. Also the forwardmost bulkhead is not riveted at this time since it will be assembled with the center section.
Friday, March 7, 2008
The aft bulkheads have been clecoed up with the skins (bottom and both sides) In this picture I have clecoed the aft top skin on but that was just to get everything to stay straight while I put the rear tail piece in. That was the hardest part, the piece is thick, and it wasn't pre-bent very well. So it only went in after a lot of trial and error- a lot of clecoing and unclecoing... 
The aft fuselage shown here starts just aft of the baggage compartment- which is about 2-3 feet aft of the seats. The J-stringers can be seen on the lower sides- 2 on each side- they need to be positioned and drilled.

Once everything has been drilled, all the parts will be disassembled, deburred, dimpled, and primed before being reassembled for riveting.
Subscribe to:
Posts (Atom)
