Finishing kit parts in the house!?!
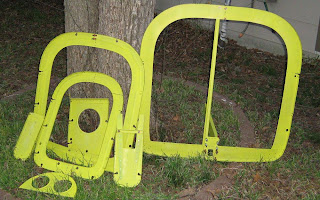
I took most of the fiberglass parts inside to protect them from the heat. Here they are with the wingtips and some firewall forward parts. Also the rudder and elevator bottoms are just visible. The greenish colored parts came with the finishing kit- wheel pants, spinner, and empennage fairing.
I got started on the canopy frame yesterday. Installed the roll bar last week as a precursor to fitting the canopy frame. The canopy process has been cited as the most difficult building step by many RVers. I've taken this to heart, and am moving very slowly, double and triple-checking measurements and plans before doing anything permanent. I haven't riveted the front fuselage parts in place yet since I wanted to get started on the canopy while it's still warm. The plexiglass canopy is more forgiving when it's warm.
Another view of the canopy frame. It's just setting in place, nothing has been drilled to the fuselage yet. The first steps are to bend the frame to fit the fuselage. It would appear at first blush that I've lucked out- the fit looks good. A little tweaking of the side rails, some adjustment at the rear and hopefully it's good to go... Wish me luck....
Sunday, September 28, 2008
Sunday, September 14, 2008
More Fuselage Stuff
Some progress in the last month- nothing big but lots of smaller tasks. I've bolted the landing gear weldments in place- the bolts that appear loose in the photo will eventually be special close-tolerance bolts that hold the wing spar in place. Also, I've run the aluminum fuel line tubing from the wing root to the valve, and the brake lines, and the vent lines. I haven't run the fuel line from the pump to the firewall, so the pump is not ready to be put in it's final place yet.
I went ahead and painted the interior- it turned out ok, but I think I will have to redo some areas. I wanted to do this before I started work on the canopy. I went ahead and final riveted the baggage area side panel you see here. All the unpainted areas still showing will be covered eventually with panels (that are finished.) I also ran the black wiring conduit down the center tunnel shown here. It is actually 1.2" polyethylene tubing for sprinkler systems, but it works great here as conduit from the spar carry-through to aft of the baggage area. The smooth walls will make it easy to run wiring for the transponder, aft lighting, and possibly other things such as ELT, strobe supply, and magnetometer.
Not shown, I made up some antenna doublers and drilled and dimpled them, one COMM antenna under the left seat and the transponder antenna just aft of the baggage bulkhead on the right side. I plan to use a wingtip NAV antenna. Also torqued the seat belt anchors. Forward upper fuselage parts are all drilled and ready to rivet- I'm going to wait a bit before finishing that up since it will get in the way for some firewall and rudder pedal installations. I also riveted the aft-most top fuselage skin- waiting on the forward aft skin until the canopy is further along.
FINISH KIT ARRIVES:
Huge box full of steel and fiberglass and plexiglass. Here is the box, showing the pink!? 2-piece cowling and the canopy. Other things in the box: engine mount, roll-over bar, fiberglass wheel pants and fairings, wheels and tires, and more. Coffee cup for scale, was not included ...
Sunday, August 3, 2008
fuelage update
Since the last update I've drilled the landing gear weldments, assembled the electric flap actuator, assembled the seat backs, and started on the fuel line plumbing. Also many other small tasks that would take too long to describe...
I painted some of the interior parts, and decided to cleco some of the parts inside the plane to see what it will look like. I use rustoleum silver "hammered finish" and I kinda like how it turned out. I will still need to spray the fixed interior parts that will show in the end- so eventually no yellow chromate will show and very little bare Aluminum (unless you stick your head under the panel, since I don't plan on painting the forward area.)
Here is the painted baggage bulkheads clecoed in place- baggage floors are still unpainted, but the seat floors have been partially painted -- seat cushions will eventually cover the unpainted areas. The white bar across the bottom is the flap actuator weldment.
The flap mechanism clecoed in place- still unpainted- The motor is visible but the part that moves up and down is not. It will eventually be bolted to the weldment but for now it is in the way.
This is the Airflow Performance electric boost pump. This kit from Van's included the filter, pump, bypass valve, and pressure relief valve as well as the Aluminum bits and mounting instructions. This pump is required for the fuel-injected engine I plan to use. The fuel selector valve is just above it to the right and, once plumbed, will allow one to switch between left and right fuel tanks.
All covers in place over the flap mechanism and fuel pump, and with the seat backs in place. Not in place: control sticks (ready to bolt in but waiting on push rods and they get in the way), landing gear weldments (ready to bolt in but I'm leaving them unbolted until I run the fuel lines through them, hopefully soon), the rudder pedals are also ready to bolt in but I'm waiting until after the fuel, vent and brake lines are run first.
Monday, July 14, 2008
Fuselage Aft Top Skins
Lots of progress- aft top skins have been clecoed and drilled, and the baggage bulkhead has been trimmed and drilled, and the nutplates that hold it on have been installed. Also the baggage area floors and side panels are ready to go. I'm currently working on the forward floors and the seat backs. Lots and lots of smaller tasks have been completed and many more still to do.
I ordered the finish kit this week. Since the cowling and motor mount depend on the engine type, that decision has to be made before ordering the finish kit. I agonized a bit, and decided on an IO-320. Thats the fuel-injected version of the O-320.
Sunday, June 29, 2008
Forward Fuse Riveted
It's been a while since I posted, and lots of stuff has been done since the last post. The forward fuselage has been riveted together! This is kind of a big deal, now I'm looking at a much larger piece of airplane when I go in the garage.
I did all the side rivets myself, but had help (Thanks Austin!) doing the bottom rivets. We rolled it on its side to finish up the several rows of rivets along the bottom. After that, I put in the little legs you see in the photo, and took it off the sawhorses. The level is used to check for any twists (there are none, mainly due to pre-punched kit rather than my skill.)
Lots of other things have been done: steps drilled and ready to mount, I redid the brake pedals a bit to make them better, put in static ports, and various other bits here and there. Next up are the aft top fuselage skins.
Sunday, May 18, 2008
Forward Fuselage
Lots of parts needed to be fabricated and modified to fit in the forward fuselage. Most of that is done and it is almost ready to be disassembled.
The rudder/brake pedals have been made up- I thought about painting them but they look pretty good raw so I left them that way. I have dual brakes- brake pedals on both pilot and passenger side.
Wednesday, April 30, 2008
Join center and aft section
Due to work, I haven't been putting in as much time on the plane as I would like, but progress is being made. I finished the center section- riveted up the center bottom skin and the seat and baggage ribs- and bent the main longerons. Here you can see the aft and center sections joined together for the first time, and the main longerons in place. I added the forward side skins too- for the first time, it's starting to look like an airplane!
Next, the firewall gets added, lots of stiffeners and angles and doublers get put in the forward area, and then it's the usual drill: drill everything, uncleco, deburr, dimple/countersink, prime, and then finally cleco back together and rivet.
Sunday, March 23, 2008
Center section begun
The center section has been clecoed together for the first time. It is upside down in this picture, only one seat rib is visible on the left. The center section bottom skin is on top. The next step is to drill all the holes, and then, once again, disassemble, deburr, dimple, prime, reassemble, and rivet.
Aft fuselage
Aft fuselage
After being disassembled, all the holes were deburred, then dimpled, and then the mating surfaces were primed. All was clecoed back together, and then riveted.
The upper rivets are left out to make room for the main longerons to be inserted between the skins and the bulkheads. Also the forwardmost bulkhead is not riveted at this time since it will be assembled with the center section.
Friday, March 7, 2008
The aft bulkheads have been clecoed up with the skins (bottom and both sides) In this picture I have clecoed the aft top skin on but that was just to get everything to stay straight while I put the rear tail piece in. That was the hardest part, the piece is thick, and it wasn't pre-bent very well. So it only went in after a lot of trial and error- a lot of clecoing and unclecoing...
The aft fuselage shown here starts just aft of the baggage compartment- which is about 2-3 feet aft of the seats. The J-stringers can be seen on the lower sides- 2 on each side- they need to be positioned and drilled.
Once everything has been drilled, all the parts will be disassembled, deburred, dimpled, and primed before being reassembled for riveting.
Sunday, February 24, 2008
Bulkheads, bulkheads, bulkheads. Here is the completed set of aft bulkheads. These will go inside the aft skins to form the rear part of the fuselage. Notice how they decrease in size. Some of them (esp. the small one in the lower center) have various Al bars and angles attached that will be used to mount the tail pieces later. These bulkheads will be used in the next step- and the parts will start looking more like an actual airplane.
There is one more bulkhead I haven't shown, the one just aft of the center section that the seat backs mount against- I messed up a part and had to order a replacement- should be here tomorrow. Once that part is fabbed up and primed, that bulkhead (F-706) will be done.
Saturday, February 16, 2008
Fuselage Carry-through
Fuselage bulkhead F-905 is the anodized center section- It was match drilled at the factory to accept the wing spar bolts. It has been completed- the uprights, web stiffeners, and cover plates( on the far side, can't see in this photo) have been primed and riveted. Also, since it is easier to do now, the control column has been bolted up as shown- those are the left and right control sticks. Also the wooden block are placeholder for the wing spars, with a relatively precise thickness.
Monday, February 11, 2008
Firewall
On to the fuselage!
The first thing to be done on the fuselage is to build the bulkheads, from front to back. The forward- most bulkhead is the firewall, on which hopefully an engine will one day mount.
It is stainless steel, with a series of aluminum angles that get riveted to the aft side. The steel weldments in the corners will attach to the longerons. Here it is partially riveted up. The open hole in the upper middle is for a box- makes room for the oil filter and prop governor- its being left out for now as per instructions to make access easier.
Flaps completed
It' s been a while since I updated the blog, but lots of work has been accomplished in the meantime. I finished both flaps:They turned out pretty well, I was a little worried about keeping them straight since they are so long (7 1/2 ft) but using the weights to hold everything against the flat building surface really kept things in alignment. I used a specially modified squeezer set (i.e., ground a bevel into one) to squeeze the trailing edge rivets, rather than the standard backriveting. The trailing edges came out nice and straight.
I'm moving on from the wings for now, and starting work on the fuselage. The wings still have some work remaining- the bottom skins need to be riveted on, and the aileron pushrods fabricated. I want to wait on the bottom skins until I decide what all I want to put in the wings (i.e., autopilot servo). And the I want to wait on the pushrods until the wings are attached to the fuse so that they can be cut to the correct length.
Saturday, January 12, 2008
Flaps
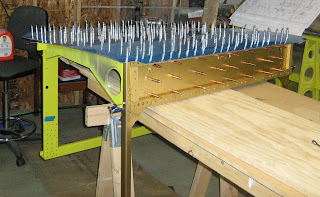
The holidays plus a bad cold kept me from making a lot of progress recently. I have started on the left flap:The building surface is essentially a custom-built jig- a very flat box made of 8' MDF panels and dimensional lumber. Since the flaps are 7' long it is important to use a flat surface to prevent twists. The holes you see were drilled to allow clecos to be used to hold the lower skin in place while everything was match drilled. Currently all the parts have been primed and are ready for riveting.
Subscribe to:
Posts (Atom)